Being on Facebook as a professional can either help or hurt your image. This article will guide you through building or editing your Facebook profile, positioning you as a value-driven professional while succeeding at your professional goals. To follow along with this tutorial starting from your home page, select your name or image on the left side of the screen. This will open a new screen that is your Profile Page.
Step 1: Profile Image
Your Profile Image is the small circular image people first see when they search for you. Make sure they can identify you, your brand, or your business. If you want others to see you as a valuable addition to their network, show them your professional image. You don’t want to lose a connection, client, or job offer because your image doesn’t reflect the professional representation of who you are or trustworthiness. To change your image click on the camera icon next to your circle image
Tips

Business Professional

Not Professional
- Your Image should be square or circular so that you don’t have issues with cropping when it is sized into a circle on the platform.
- Make sure the image is not too cluttered, and you can be recognized in a professional setting or a clear headshot where they can see your face as you look today.
Step 2: Cover Photo
The cover image is a great way to showcase your professionalism. You can use Canva to create your cover for free. Use a template and show yourself at work, helping other people or doing a presentation in front of a whiteboard. You can include a professional title or the name of your business. If you have your own business, you can add your tagline to the image.
Another idea would be to contact a local brand photographer who will work with you to create the message through a photo scene that is more than just a headshot.
To change your cover photo click on the camera icon at the bottom right with the Edit Cover Photo text.
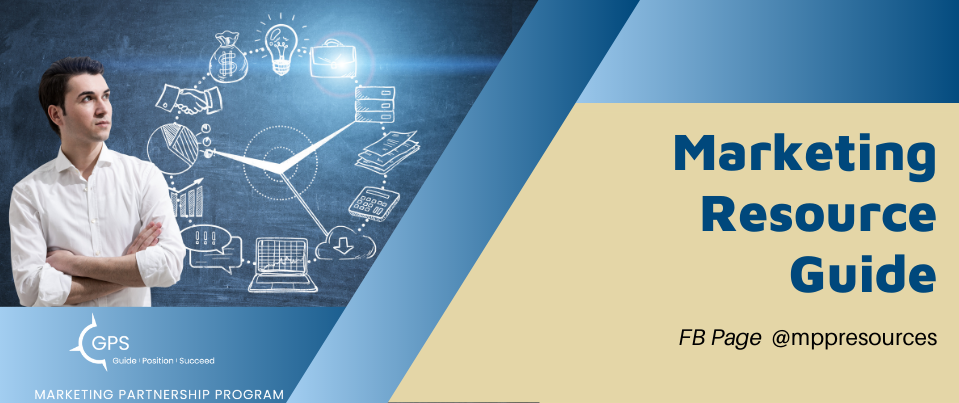
Example of a Personal Cover
Example of a Business Page Cover
Tips
-
- Use Canva to create your cover photo for free at https://www.canva.com/
- Size should be: 820 pixels wide by 312 pixels tall
- When creating a personal cover, keep in mind that the profile image will overlay in the bottom center.
- When creating a business Cover Photo, the profile image is on the bottom left side.
Step 3: Facebook Bio
In this section of Facebook, you have 101 characters to let people know who you help, what you help them with, and how you do it. Be clear and to the point.
My Example is; I help Guide Entrepreneurs and Professionals through proven strategies that position them to succeed.
Your goal is to create a clear statement of the value you offer clients, customers, employers, or whomever you help.
To add a Bio Select Add Bio below your name. If you need to edit your Bio click on Edit below your existing bio.

Step 4: Customize Your Intro Information
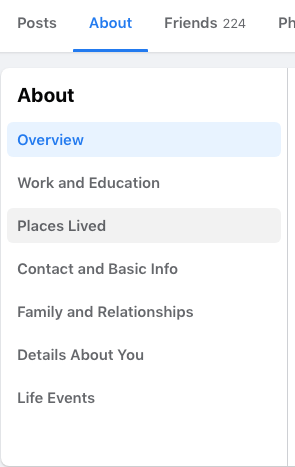
To edit your intro, click on About below your Name and Bio, next to the Posts on the left. Here you will see your overview. For now, select Work and Education just below the overview.
- Work: To add a workplace, click the “+” button. To edit a workplace, select the three dots on the right. You can choose what is seen by clicking on the icon next to the three dots; a window will appear to select the audience you want to see the information. Remember to use words that you would put on a resume highlighting how you added value at that workplace.
- Education: Under this section, you have your standard College and High School, But you can also add certifications under the college section to show all your educational accomplishments. Once you have added all the workplace and education, you would like to be shown scroll back to the top, and select Places Lived below About.
- Places Lived: You can add other places you have lived, but limit this to not overwhelm potential connections with too much information.
- Current City: To edit a current city select the three dots on the right. You can choose what is seen by clicking on the icon next to the three dots; a window will appear where you can select the audience you want to see the information. You should share this publicly because it helps add creditability to your profile and also attract local clients.
- Home Town: This one is totally up to you; it may make a connection with a local in that area or someone who has also lived there.
The next section is Contact and Basic Info:
- Phone: Leave this as “Only Me.” Not listing this publicly if it’s your business number. You don’t want family and friends using it, and if it’s your cell number, you don’t want clients calling it. You can edit your number by selecting the pencil icon; this will open a new window. Follow the directions and then use the back arrow on the top left side.
- Address: Don’t make this public on your personal page; leave this as “Only Me.” You can edit this information by selecting the pencil; it will open the fields in the same window. Fill out what you want and select save.
- Email: Put both a personal and professional email on your list but only list your business email as public. To Edit or add, select the pencil icon; a button will appear to add or remove emails. Once you click on that, a new window will open, follow the directions and then use the back arrow on the top left side.
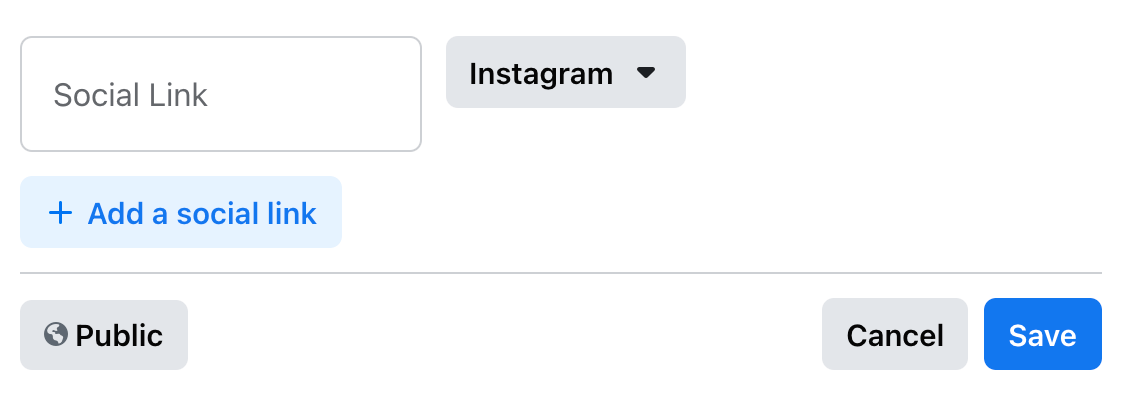
- Websites and Social Links: Select the plus button to add your website or a lead capture landing page. For Social Links, you need to select the add social button twice the first time; if you already have one or more social media account attached, select the pencil.
1st Add
2nd Add

First, select the social channel you want to link to in the dropdown menu on the right. Then paste the address in the box but only use info behind the main address.
See Example Below:
MarketingPartnershipProgram
Not:
www.pinterest.com/MarketingPartnershipProgram/
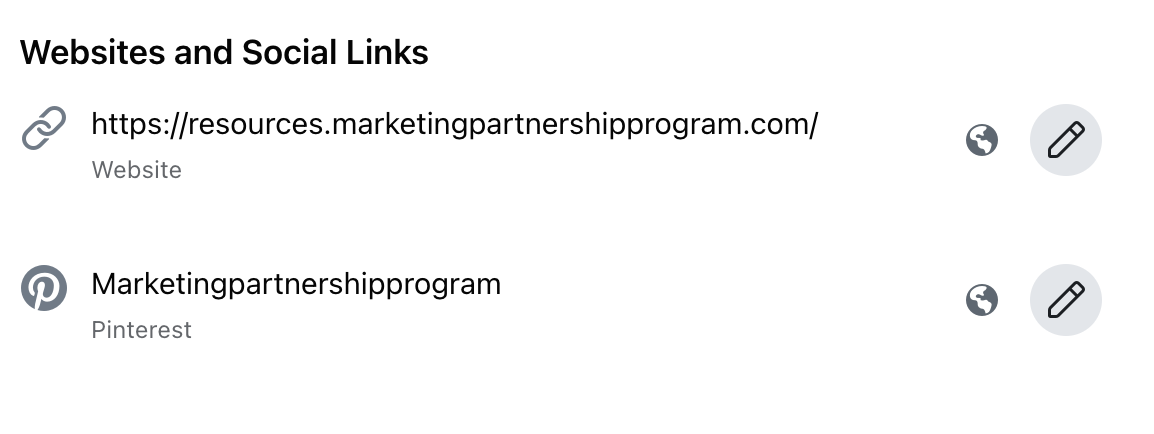
Once you have added your website and social links, test them and make sure they work by clicking on the address you just entered. They will open in a new tab that you can just close.
Other Basic Info: Here, you can Add Languages you speak that might attract clients. Stay away from the religious, political, and personal views as well as who you are interested in; unless it applies to your target market. The last thing in this section is the birthday and birth year, which is a personal choice.
- Under Family and Relationships: I chose only to share my spouse because we are in business together.
Moving on to Details About You
- About You: In this section of Facebook, let people know who you help, what do you help them with, and how do you do it. This is where you want to be very clear. My Example is (I enjoy guiding others to develop the skills need to live a fulfilled life finding their own unique contribution to the world we share.)
Your goal is to create a clear statement of the value you offer clients, customers, employers, or whomever you help.
- Name Pronunciation: If your name is hard to pronounce, fill this out to help communicate with your potential clients.
- Other Names: For Professional Reasons, you can choose a nickname that like your title or position and then check the box to show it at the top of your profile. This will then make it appear behind your name.
An Example; Business Resource Guide or Certified Business Coach.
Your goal is to create a clear statement of what your title or position is.
- Favorite Quotes: This is an example of adding a Quote that adds value to what you do or why some should connect with you.
- Blood Donations: This is another example of only if it is of interest to your target market.
The Next two items to look at are Hobbies and Feature Images:
Scroll up to the top of your profile so you can see the edit profile button and click it.

Hobbies: Hobbies can be things that enhance your overall image: Board Games, Reading, Learning, or anything that shows your intelligence and teamwork abilities.
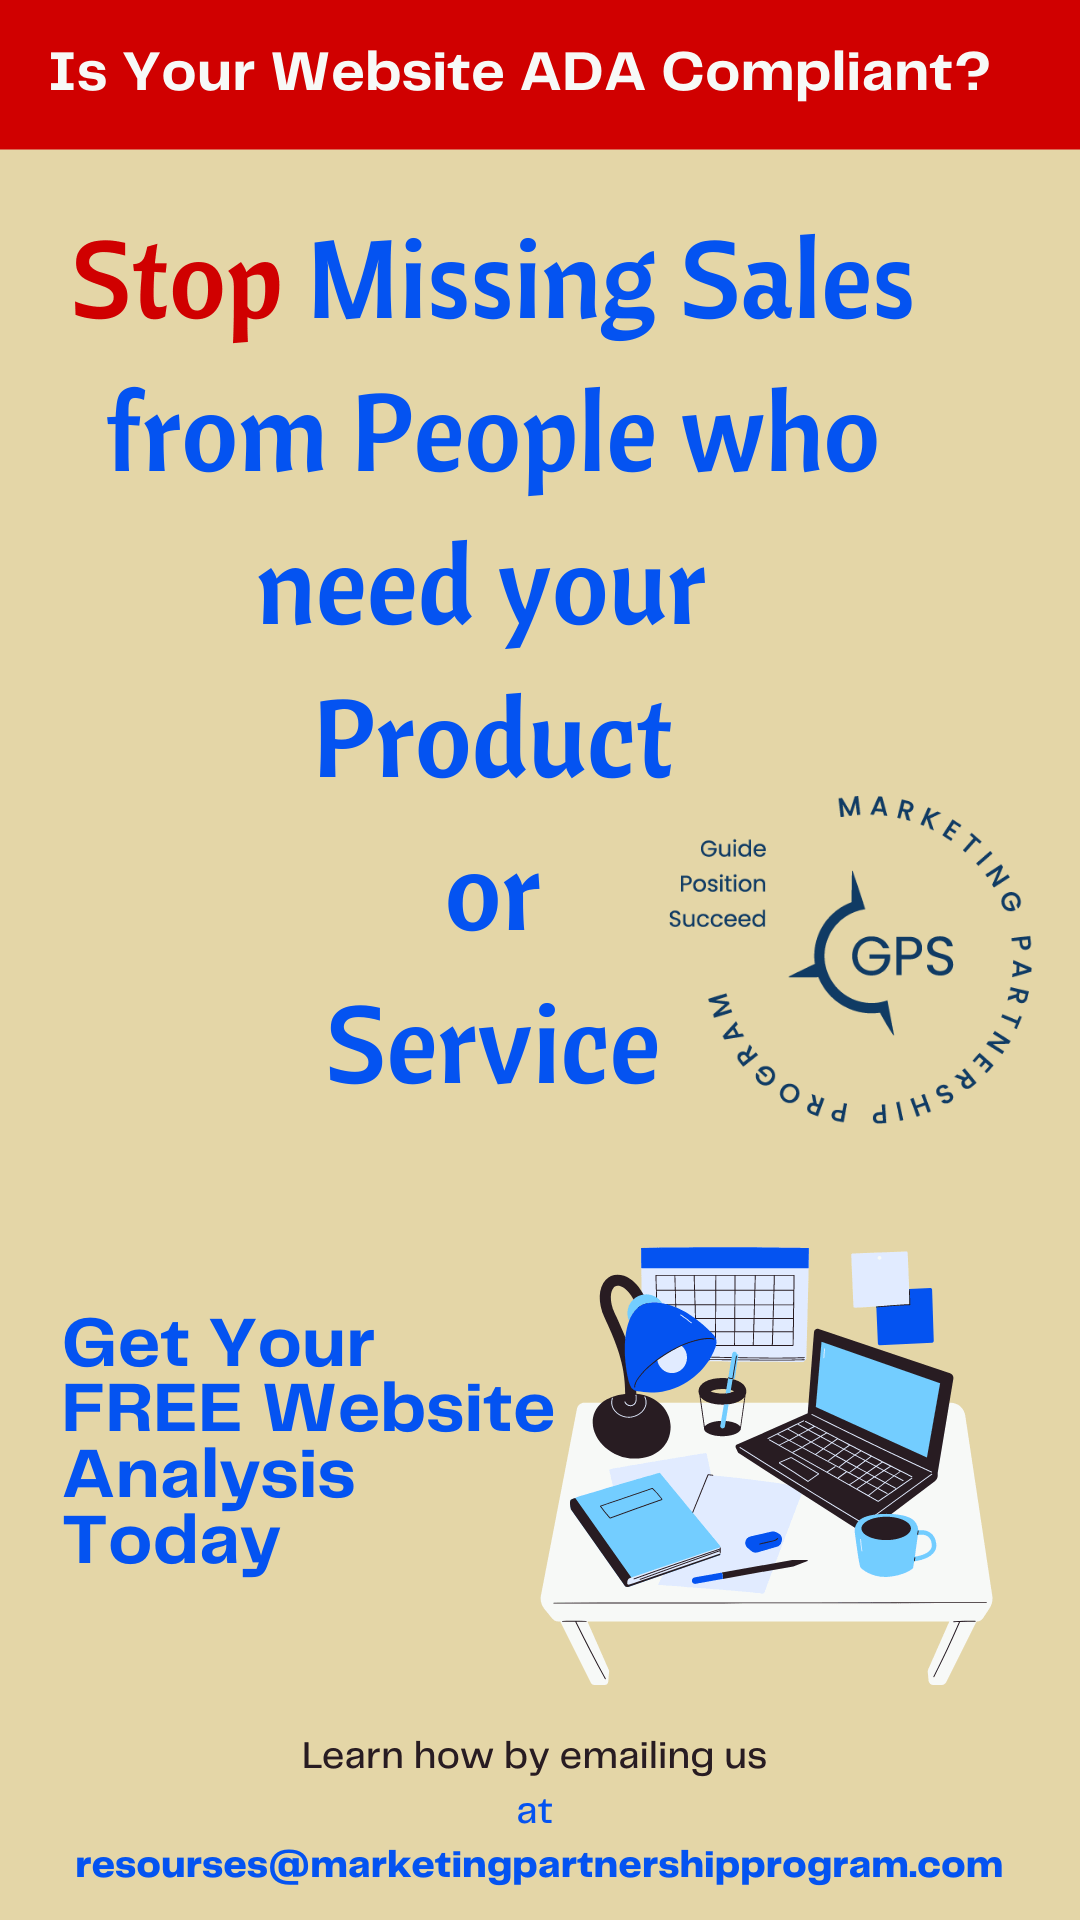
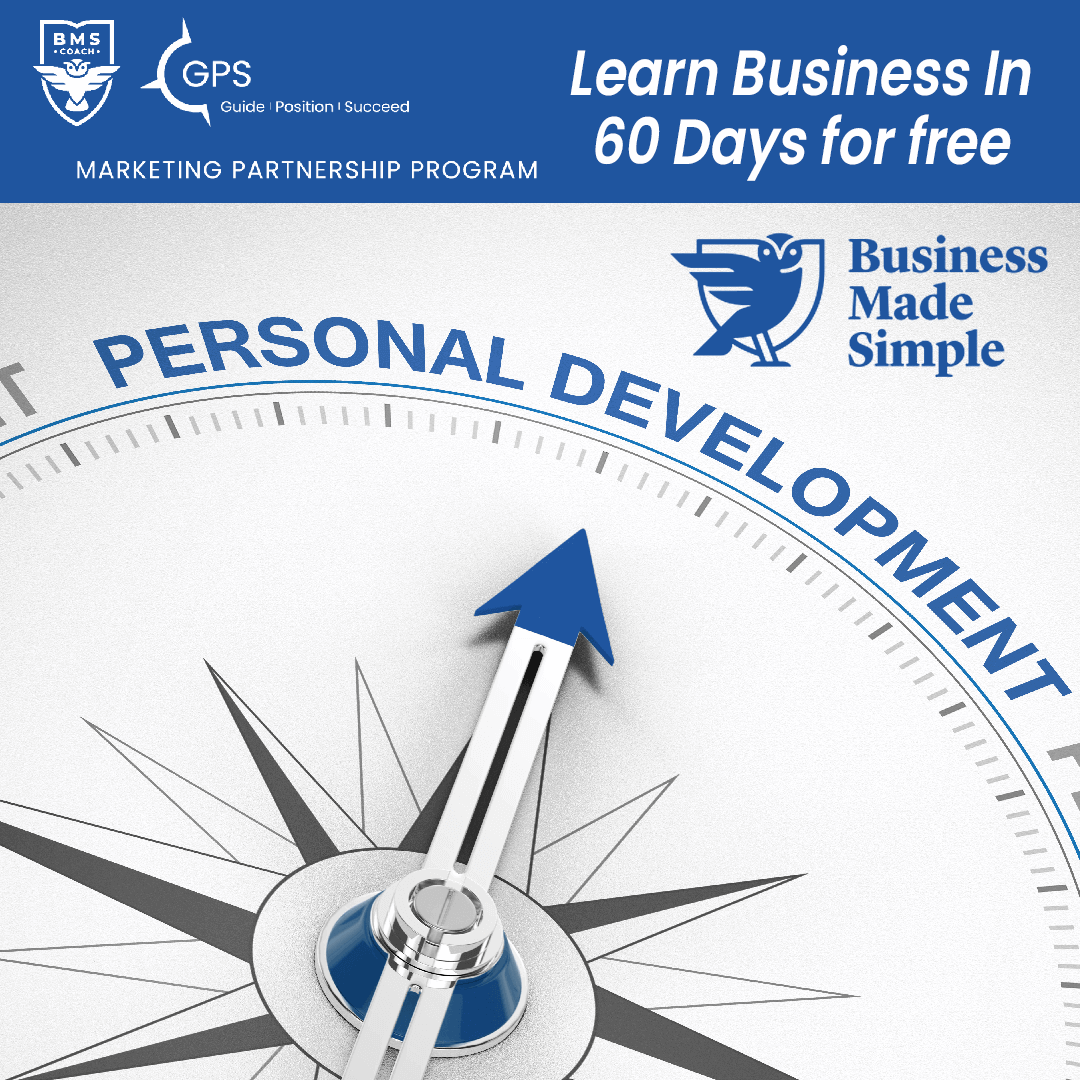
Featured Images: This can be a bit tricky because it is not the same for everyone. Some are in the form of Featured Collections and are in what’s called a story format. Other people may see an image that shows square images.
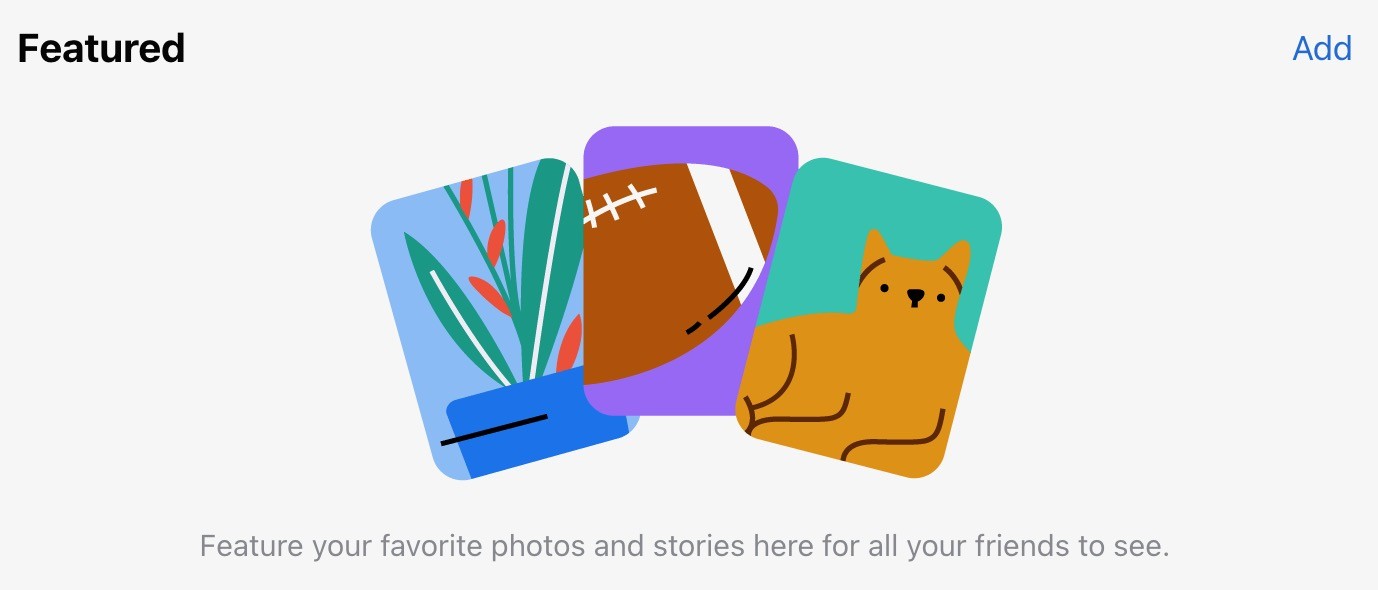
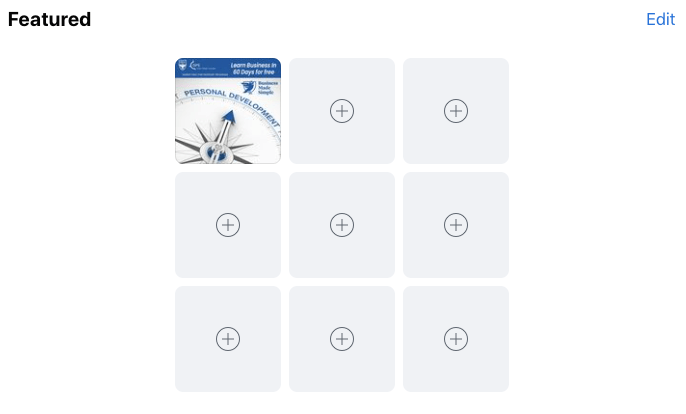
For those with the above type of featured image option using a program like Canva, create an image that is 1080 pixels by 1920 pixels. Add a Call to Action that works for your business.
For those with the above type of featured image option using a program like Canva, create an image that is 1080 pixels by 1080 pixels. Add a Call to Action that works for your business.
Step 5: Your Facebook Timeline Privacy Settings
Setting & Privacy:
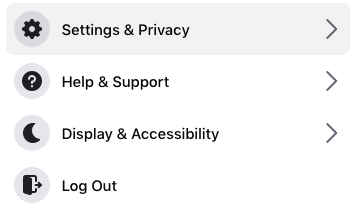
To get to the settings, look to the top right side of the window and the down arrow. It will be black and grey until you hover over it, then it will turn light blue. Once you click on it, you will see a Dropdown Menu.
From that Dropdown Menu, you will select Settings & Privacy with the Gear Icon. That will open a second Dropdown Menu where you will select the Settings option next to the gear icon. This will take you to General Account Settings.
Dropdown Menu
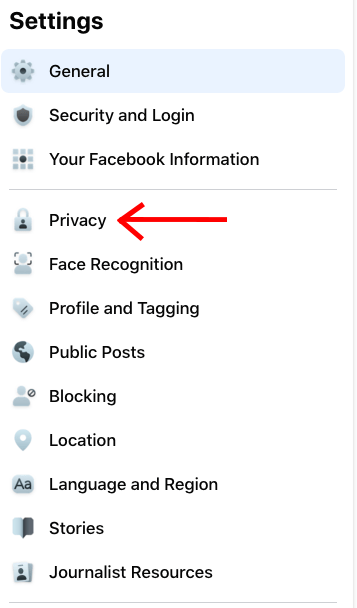
From this new window select the Privacy option on the left side of the screen. A new window will open where you can edit what others can see both publicly and privately. Under Your Activity Section.

Your Activity Settings:
Who can see your future posts? Select the “Edit” hyperlink on the right side of the screen to see the options for this setting.
A grey section will open in the window, and at the bottom of that section, you will have a drop-down menu to select “Who should see this?” It may show Friends or Public as a default.
Click on that option to get to the drop-down menu; set this to Friends. When Selecting Friends as a default, this will prevent your pictures and posts meant for family and friends from being seen by the public. However, be selective about what you share with that group because if you accept a client as a friend, they will be able to see it. I will share more about that later because it’s not a great Idea to have your clients as Friends.

Review all your posts and things you’re tagged in: Here, you click on the Use Activity Log on the left side of the screen. Once you do this, a new window will open.

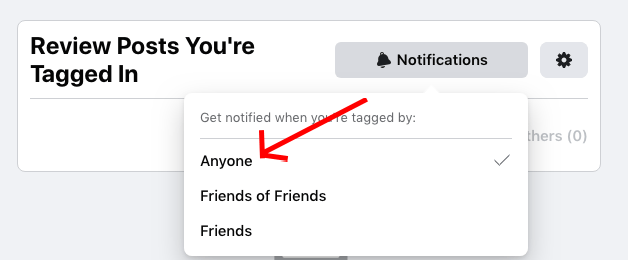
First, Select the Notifications Button with the Bell Icon; this will open a window to select posts you want to be notified about. Select the option of Anyone. By doing this you have control over tagged images before they appear in your profile.
This option will allow you to review any post that you have been tagged in and prevent your professional competition from using your Audience or Timeline as a billboard for their content. Also, you can make sure your tagged content meet your approval even when posted by family and friends.

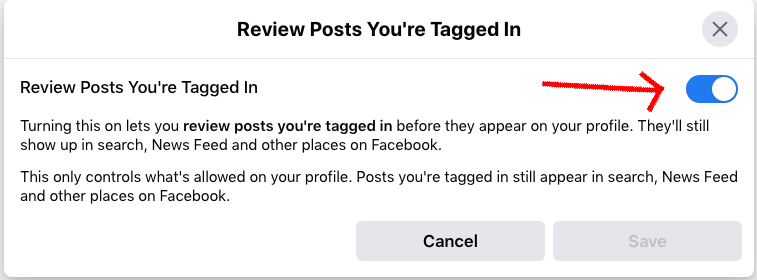
Next, select the gear icon next to the notifications button on the right. Make sure this option is toggled on and then select Save at the bottom. Please know that this only controls what is seen in your profile. They can still show up in the Facebook search. There is another process to have tags or things deleted from Facebook, but I will not address that here. You can ask other people or pages via messenger to remove your tag from posts or images. Use the back arrow on the top left of your browser window to go to the next section.
Limit the audience for posts you’ve shared with friends of friends or Public? It is important if you have been on Facebook before and may have content you would like to limit now. A grey section will open in the window.
Click on the button “Limit Past Posts” towards the bottom of the grey window. Once you click on the button, a new window will pop up.
Click on the Blue Button to Limit Past Posts. This will make all posts and images change to the option you selected in the first section. After that you will be able to go back and change specific posts and images public one by one.
Once you click on the Limit Past Posts button, another window will appear to let you know the process is complete.
All you will need to do is hit the close button to bring you back to the previous screen.


Who can see the people, Pages, and lists you follow? In this section, you can select who sees the things you like and follow.
This is a personal choice and will depend on how much you have liked and followed in the past. Because I have been on Facebook for over ten years, I chose “Friends only.” However, if you follow other professionals or competitors in your market to stay informed of trends or for networking, you may want to keep this selected as “Friends only” so that they do not show up on your page.
How People Find and Contact You
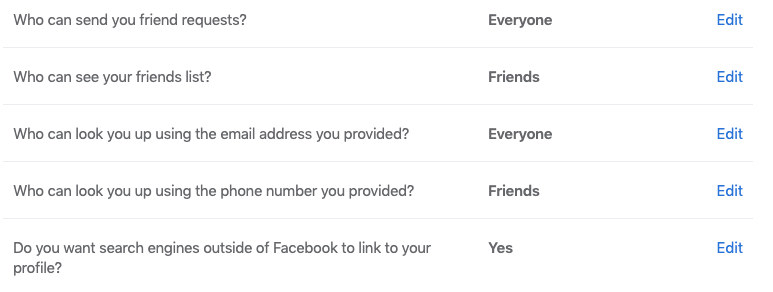
This section is straightforward; select the “edit” next to each item and decide the settings you want. A grey box will appear with the dropdown box at the bottom to select your Audience. Look below to see my settings and recommendations.
Who can send you friend requests? Everyone – Choose this so people who may not be on Facebook today can find you later.
Who can see your friends list? Friends – This way your friends can see each other. Use this for family as well, so they can connect.
Who can look you up using the email addresses you provided? Everyone – This so all clients, customers, and networking opportunities can find your profile.
Who can look you up using the phone number you provided? Friends – You don’t show this publicly, list only Friends so it only shows to those who already know it.
Do you want search engines outside of Facebook to link your profile? Yes – So all clients, customers, and networking opportunities can find your profile. If you don’t have a personal website, you can still appear in google results.
How you Get Message Requests
This section is straightforward; select the “edit” next to each one and decide the settings you want. A grey box will appear with the dropdown box at the bottom to select your Contact Method.
Chats – This is where messages appear at the bottom right-hand side of the screen when you are online. Or have a Chat Auto Responder Set Up.
Message Requests – This option will show up on the right side of the screen next to the settings and bell icon.
Don’t Receive Requests – Don’t do this. You may miss a connection you are looking for.
Profile and Tagging
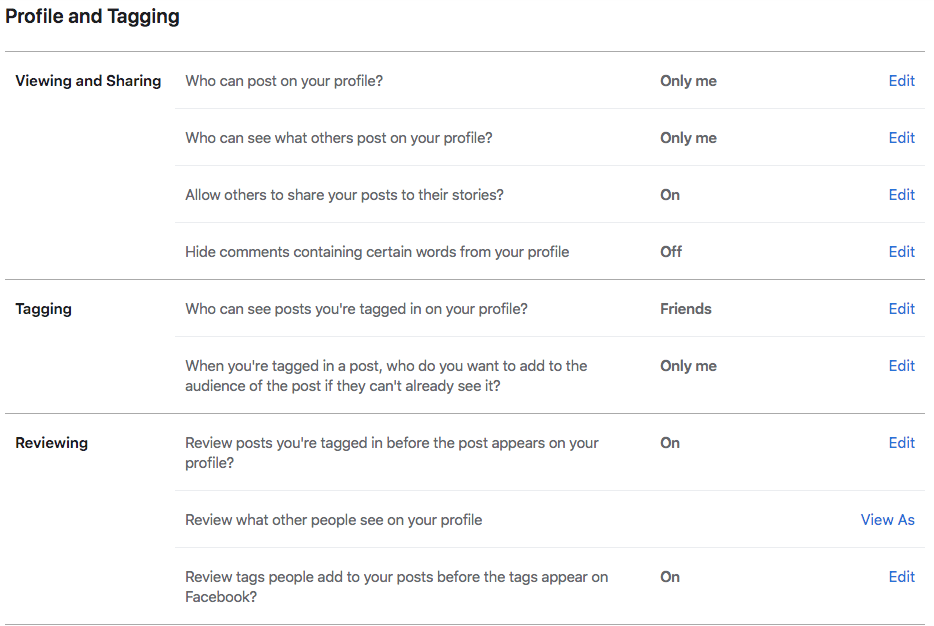
This section is simple, select the “edit” next to each one and decide the settings you want. A grey box will appear with the dropdown setting at the bottom to select your Audience. Keep in mind that you should keep the default to a narrow Audience, and you can adjust specific posts to be public when appropriate. Recommendations below.
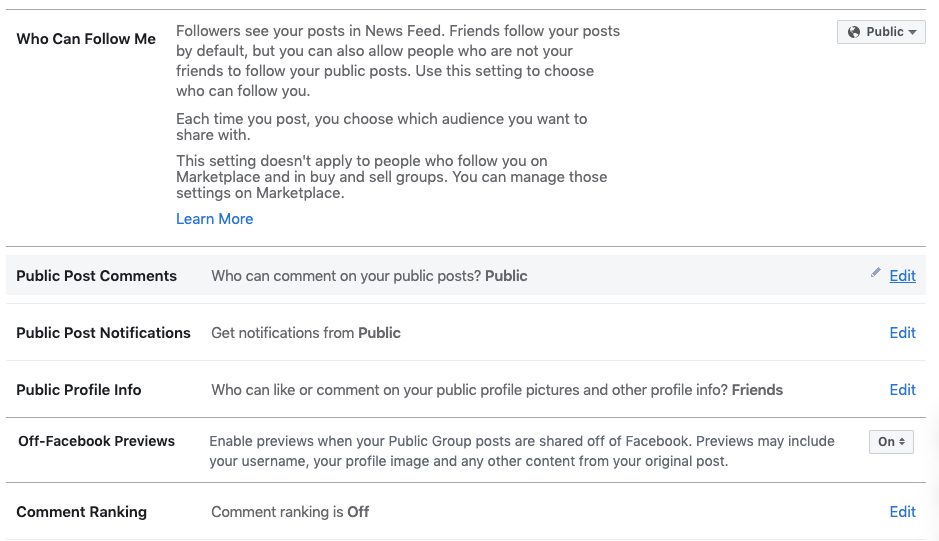
Public Posts
This section is important and will allow your clients, customers, and potential connections to follow your public content without becoming friends and seeing your private content. So make sure the Who Can Follow Me is set to Public.
The only other setting you need to review is Public Profile Info; This is a personal preference where you can choose who can comment on your public content. If you want interaction, turn it to Public; if not, set it to Friends.
Step 6: Check Your Updated Public Intro Information
Start by scrolling up to the top of your profile so you can see the edit profile button. There are two ways to see what you have done.
- Click on the Edit Profile and then scroll to the Customize your Intro to see a brief overview. Then select the edit button to toggle items on or off. In this section, you can also toggle your Join Facebook Date: I chose not to make this public even though I have been On Facebook since 2008. If you just joined, it could hurt your creditability with long-time Facebook Users. Then click save when you are done.
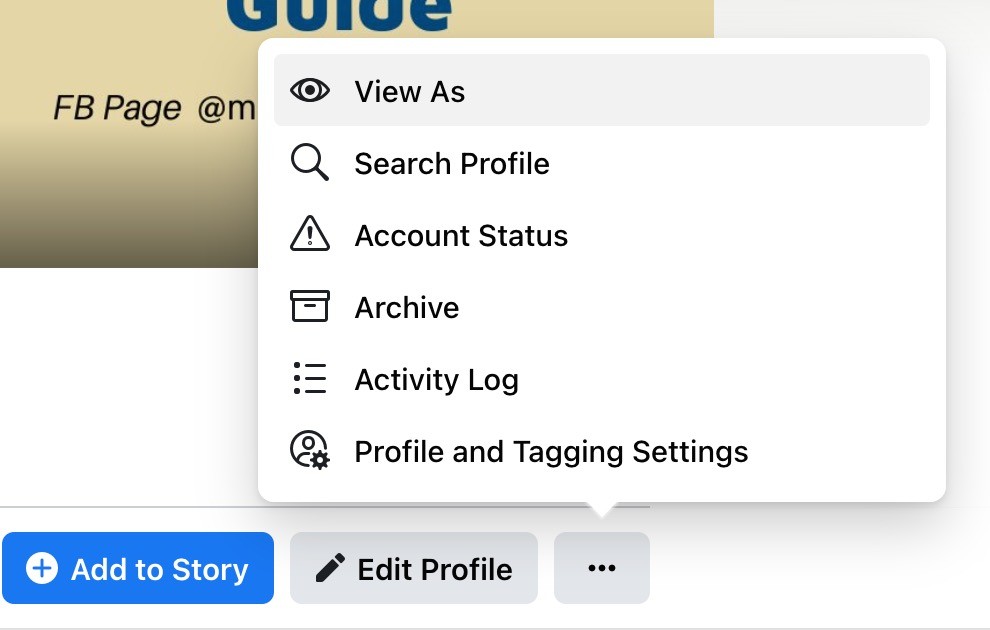
2. The other way to see what’s public in your Intro is to click on the eye icon next to edit your profile, and you can see your profile as it looks publicly; if you don’t see the eye icon click on the three dots to the right and then select View As on the top of that menu.
Edit Profile Button for Toggles

Click the Eye Icon


Step 7: Creating Content to Share
Creating Posts:
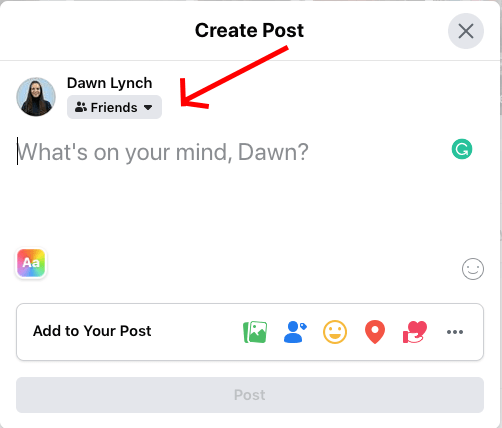
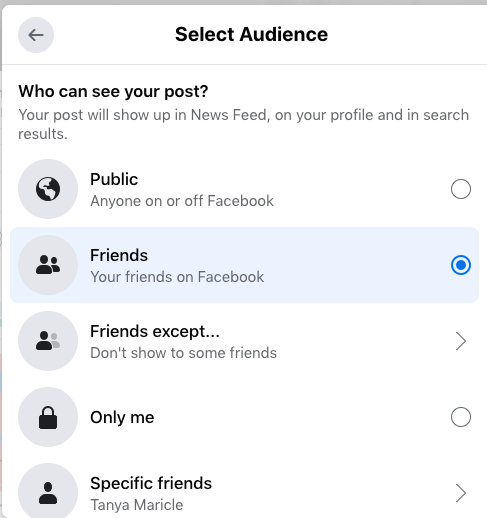
From your profile or Newsfeed, look for the area that asks What’s on your mind? Click inside that field, and you will see a “Create Post” window open. When creating a post, you can choose who sees the content by selecting from the dropdown menu below your name. If you forget, it’s set to Friends, and it’s easier to go back and change to Public if needed.

Sharing Posts:
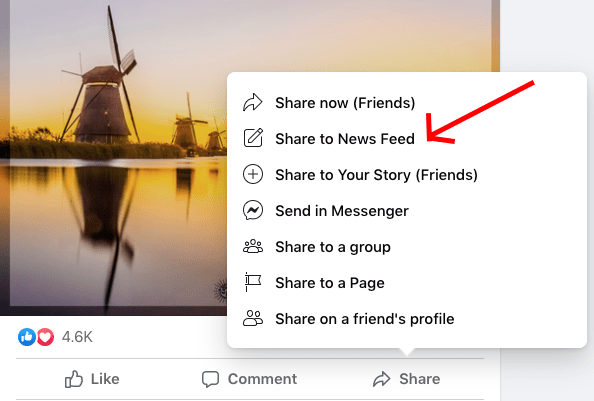
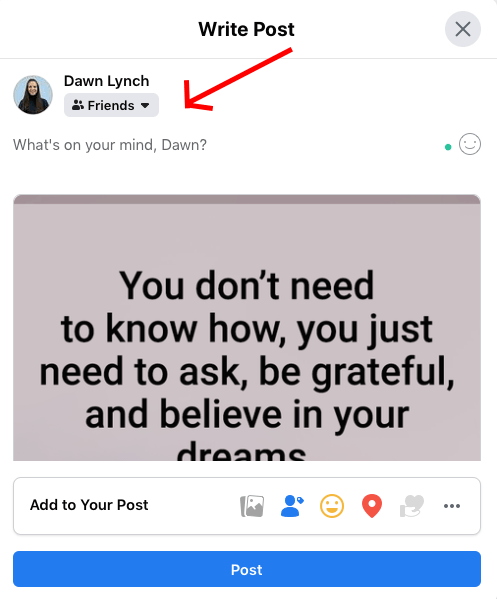
When you see something on Facebook you would like to share publicly, click the Share Button. When you select “Share,” you will get a list of options; chose “Share to News Feed.” Next, a window will open “Write Post” this is where you should add to the shared material. If you share someone else’s content publicly, you add value to it by sharing why you think it’s helpful or important to your public Audience.
This way, they will want to follow you, not just the original content creator, because of the value you added to the content. Just type in the value you have added in the “What’s on your mind” Section and then Select Post!
**Be careful to make sure you don’t share too much of others’ content. Your Profile should not be a billboard for other people’s content. You want people to follow you for what you add “As a Value-Driven Professional.”

Always be mindful about what you Post or Share:
Many Professionals overlook the benefits and the risks involved with using Social Media. Always be mindful of what you post, whether the content is only about you or involves others. Keep in mind that your content, even when marked as private, could be seen, shared, or stored by someone else. Think about everything you post. If there is even the slightest chance that you may regret the post, don’t post it.
Keep Your Social Media Professional
- Don’t Complain about other businesses or professionals. This Drama will not damage their image. It will damage yours.
- Stay away from Jokes; you may be funny in person, but online you can’t read a room, and it’s easy to be misunderstood.
- Don’t rant or use profanity of any kind.
- Proof your content yourself and find someone you trust to check it before you post when possible.
- Remember, the Internet is forever, and even if you delete something, you don’t know who already has seen it.
Subscribe To Download
Your Free Guide
“7 Steps to A Professional Facebook Profile“
Use guide you through building or editing your Facebook profile, positioning you as a value-driven professional while succeeding at your professional goals
Hire a Guide to Help you Create a Life of Meaning
It’s easy to feel like you’re just watching your life go by without really living it. If you’ve tried everything, but nothing seems to work out the way that you envisioned for yourself. You feel more like a spectator in your own life than an active participant.
Sure, you got good advice, but it means nothing without an action plan in place. If you’re starting to doubt that change is possible. Maybe it’s all a pipe dream. After all, people don’t get to live life on their own terms and thrive doing it. Do they? The answer is, “Yes. They do and it starts with becoming a Hero on a Mission.”

After this training you will have a plan of action that ensures you can:
📍 Be more productive
📍 Have a clear vision of your future
📍 Move towards your goals daily
📍 Live a life full of meaning and purpose
We are here to help business owners just like you. Our mission is to help create easy-to-follow roadmaps customized for their business. Hire us to be your GPS, we will analyze where you are and map out a path to your desired destination.
Get Started Today!
If you found this content useful, please rate this article below. If you would like to comment or be notified when we add more content, just register click on the button below.
